A Beginner-Friendly Guide to Importing with Excel, CSV, and Other Sources
When implementing an ERP system like Acumatica, one of the first and most critical steps is importing existing customer data, whether it’s from an Excel sheet, another ERP system, or a third-party CRM.
The good news? Acumatica makes data imports structured, flexible, and code-free.
In this Article, we’ll walk through a real-world example of importing customer data using a CSV/Excel file. Even if your source is a third party platform, XML, or SQL database, the same core method using Data Providers and Import Scenarios.
Why Data Import Matters
Data import capabilities in Acumatica are essential for:
- Migrating from legacy systems to Acumatica
- Consolidating customer data from external CRMs or portals
- Automating recurring data syncs from partners or third-party tools
Whether you’re using CSV, Excel, or Acumatica’s built-in tools make it possible to bring in external data reliably and efficiently with zero code.
Supported Data Sources for Import
Acumatica allows importing data from a variety of sources. Common data sources include:
- Excel / CSV files
- Database queries (including MySQL, SQL Server, etc.)
- XML files
- Salesforce and other cloud systems
In this article, mainly focus on using CSV/Excel, as it’s beginner-friendly but keep in mind, these steps are adaptable to other source types.
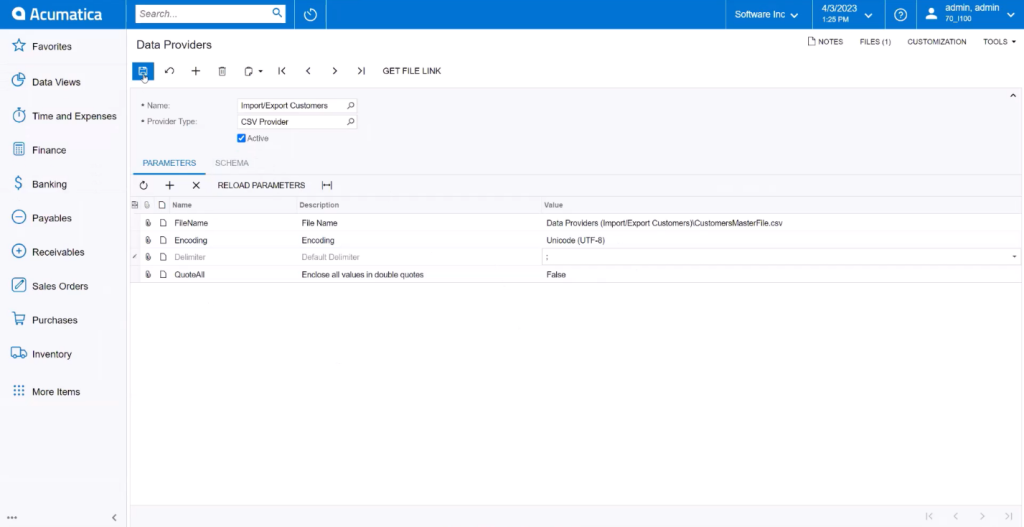
Step 1: Create the Data Provider
The Data Provider tells Acumatica where to pull your source data from.
Go to: Integration → Profiles → Data Providers (or search the screen name using the navigation search bar)
- Click ➕ to add a new provider
- Set:
- Name:
Import Customers - Provider Type:
CSV Provider
(Other options like REST, OData, or SQL can be selected for different sources.)
- Click the Files button and upload your CSV or Excel file.
After uploading, theFile Nameparameter will auto-fill.
In the Parameters tab:
- Encoding:
UTF-8 - Delimiter:
;or,(depending on your file format)
In the Schema tab:
- Under Source Objects, check the Active box for the uploaded file
- Under Source Fields, check Active only for the fields you want to map to Acumatica
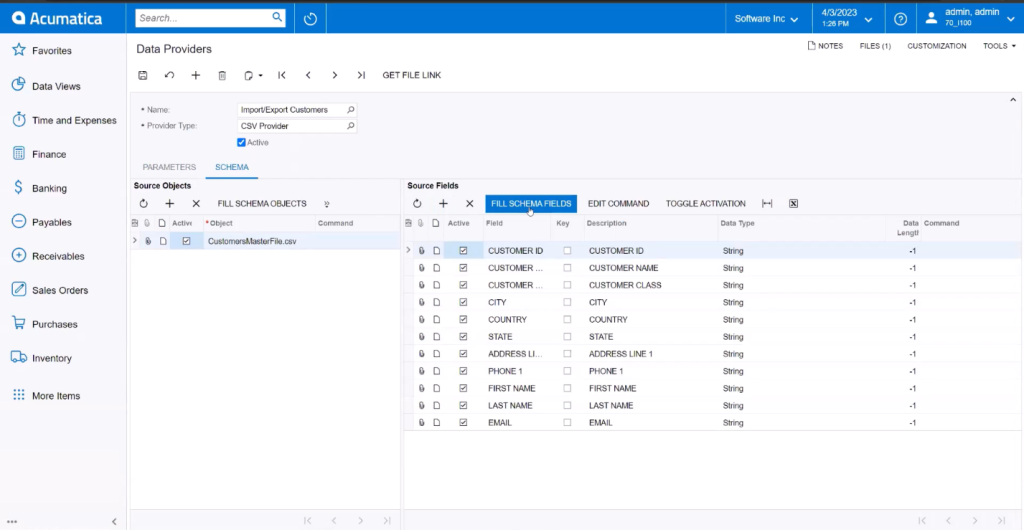
This setup works for importing customers, items, sales orders, and more.
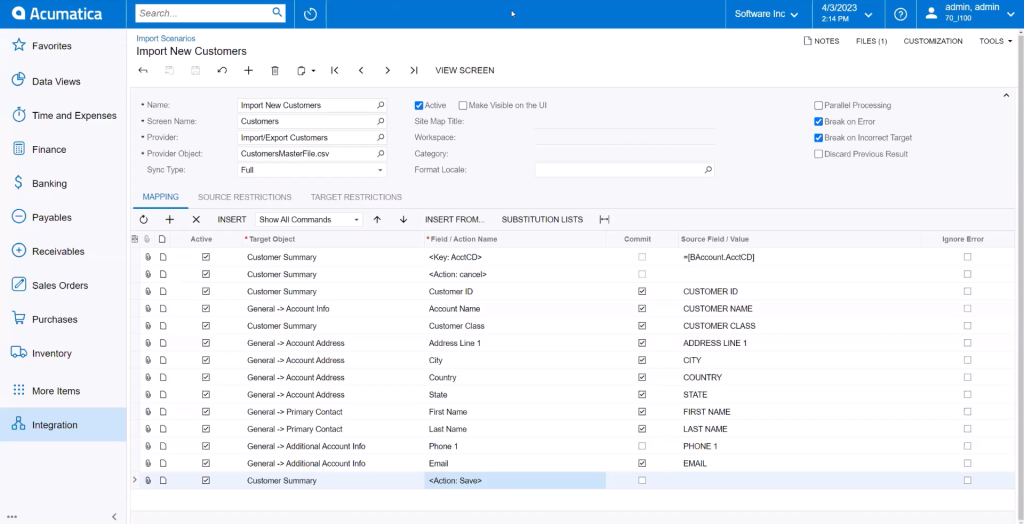
Step 2: Design the Import Scenario
Now it’s time to map the fields from your source file to Acumatica ERP fields.
Go to: Integration → Profiles → Import Scenarios
- Click ➕ to create a new scenario
- Fill in:
- Name:
Import New Customers - Screen Name:
Customers - Provider: your data provider (e.g.
Import Customers) - Provider Object: your uploaded file (e.g.
CustomersMasterFile.csv) - Sync Type:
Full
In the Mapping tab:
Map the fields from your file to Acumatica’s fields as above image provided
You can use substitution lists, formulas, or conditional logic to create advanced scenarios as needed.
Step 3: Run the Import
Go to: Integration → Transactions → Import by Scenario
- Select your import scenario

- Click Prepare to preview data
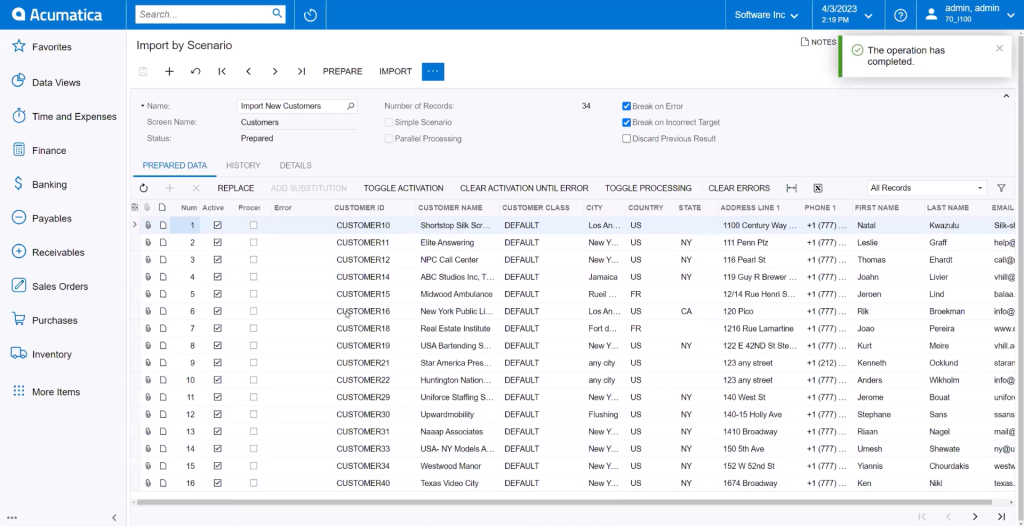
- Click Import to begin processing records
Handling Errors:
Examples:
- Email errors: Usually due to invalid formats like
www... - Missing or invalid fields: Check for required fields and correct data types
Fix the data in your CSV file and re-run the import as needed.
Beyond One-Time Imports
Once you’ve set up the scenario, you can go even further:
- Schedule automated imports for recurring syncs
- Use API-based integrations for real-time updates
- Extend to vendors, inventory, orders, projects—just by changing the screen and field mappings
- Connect directly with third-party platforms like Shopify, Salesforce, or custom middleware